Introduction
In this post, we will see how we can set automatic JS and CSS versioning to ignore the browser cache whenever the files are updated on the server. We will create a simple MVC project and call one JavaScript file from the View.
Step 1
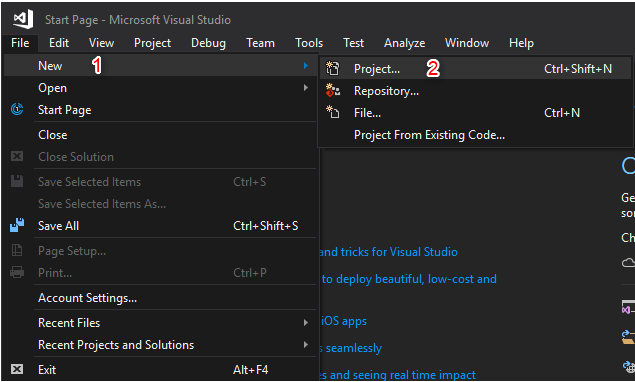
Open Visual Studio and select “File” >> “New”. Then, click on Project.

Step 2
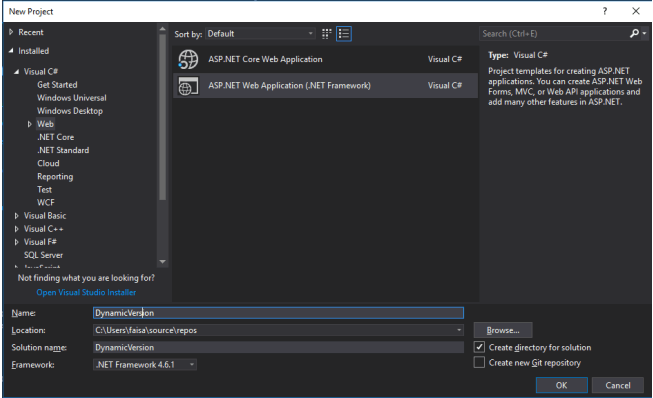
Select “Templates” >> Visual C# >> Web then ASP.NET Web Application (.NET Framework), and put the appropriate project name. Click the “OK” button.

Step 3
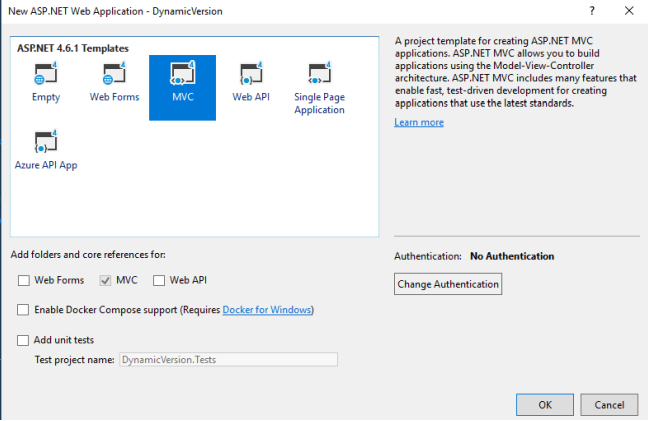
And from here, select MVC project (you can select the project as per your requirement).

Step 4
Now, go to the .cs file where you want to create the extension method to append the versions. I’m creating a Helper class in which the below code will be added.
Note
The class must be static and publicly accessible.
Here, we will create an HtmlHelper extension method which we can use anywhere in the project. Copy the below code and put it in your .cs file.
private static string GetVersion(this HtmlHelper helper, string filename)
        {
            var context = helper.ViewContext.RequestContext.HttpContext;

            if (context.Cache[filename] == null)
            {
                var physicalPath = context.Server.MapPath(filename);
                var version = $"?v={new System.IO.FileInfo(physicalPath).LastWriteTime.ToString("MMddHHmmss")}";
                context.Cache.Add(filename, version, null,
                  DateTime.Now.AddMinutes(5), TimeSpan.Zero,
                  CacheItemPriority.Normal, null);
                return version;
            }
            else
            {
                return context.Cache[filename] as string;
            }
        }

        public static MvcHtmlString IncludeVersionedJs(this HtmlHelper helper, string filename)
        {
            string version = GetVersion(helper, filename);
            return MvcHtmlString.Create("<script type='text/javascript' src='" + filename + version + "'></script>");
        }
And that’s it. We have created the extension method which we are going to use in View to append dynamic versioning.
Step 5
Go to the .cshtml file (your View) and add the below line.
@Html.IncludeVersionedJs("/Scripts/bootstrap.js")
@Html.IncludeVersionedJs is the extension method we created.
syntax
@Html.IncludeVersionedJs(“YOUR FILE PATH”)
The full code of helper class
using System;
using System.Collections.Generic;
using System.Linq;
using System.Web;
using System.Web.Caching;
using System.Web.Mvc;

namespace DynamicVersion
{
    public static class Helper
    {
        private static string GetVersion(this HtmlHelper helper, string filename)
        {
            var context = helper.ViewContext.RequestContext.HttpContext;

            if (context.Cache[filename] == null)
            {
                var physicalPath = context.Server.MapPath(filename);
                var version = $"?v={new System.IO.FileInfo(physicalPath).LastWriteTime.ToString("MMddHHmmss")}";
                context.Cache.Add(filename, version, null,
                  DateTime.Now.AddMinutes(5), TimeSpan.Zero,
                  CacheItemPriority.Normal, null);
                return version;
            }
            else
            {
                return context.Cache[filename] as string;
            }
        }

        public static MvcHtmlString IncludeVersionedJs(this HtmlHelper helper, string filename)
        {
            string version = GetVersion(helper, filename);
            return MvcHtmlString.Create("<script type='text/javascript' src='" + filename + version + "'></script>");
        }
    }
}
My Layout page
<!DOCTYPE html>
<html>
<head>
    <meta charset="utf-8" />
    <meta name="viewport" content="width=device-width, initial-scale=1.0">
    <title>@ViewBag.Title - My ASP.NET Application</title>
    @Styles.Render("~/Content/css")
    @Scripts.Render("~/bundles/modernizr")
</head>
<body>
    <div class="navbar navbar-inverse navbar-fixed-top">
        <div class="container">
            <div class="navbar-header">
                <button type="button" class="navbar-toggle" data-toggle="collapse" data-target=".navbar-collapse">
                    <span class="icon-bar"></span>
                    <span class="icon-bar"></span>
                    <span class="icon-bar"></span>
                </button>
                @Html.ActionLink("Application name", "Index", "Home", new { area = "" }, new { @class = "navbar-brand" })
            </div>
            <div class="navbar-collapse collapse">
                <ul class="nav navbar-nav">
                    <li>@Html.ActionLink("Home", "Index", "Home")</li>
                    <li>@Html.ActionLink("About", "About", "Home")</li>
                    <li>@Html.ActionLink("Contact", "Contact", "Home")</li>
                </ul>
            </div>
        </div>
    </div>
    <div class="container body-content">
        @RenderBody()
        <hr />
        <footer>
            <p>© @DateTime.Now.Year - My ASP.NET Application</p>
        </footer>
    </div>

    @Scripts.Render("~/bundles/jquery")
    @Scripts.Render("~/bundles/bootstrap")
    @Html.IncludeVersionedJs("/Scripts/bootstrap.js")
    @RenderSection("scripts", required: false)
</body>
</html>
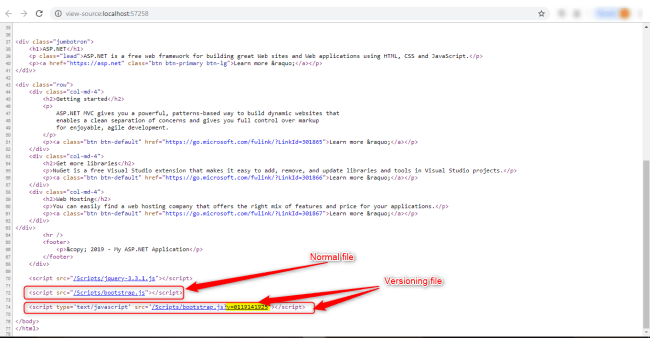
Output

Please give your valuable feedback/comments/questions about this article below. Please let me know how you like and understand this article and how I could improve it.


Hello I have one query.
In step-4, You told that this code should be added in .cs file.
My question is that in which .cs file should I add that code.
Waiting for your reply.
if you read the full sentence, you will get an idea, that I’m talking about a new class namely helper, you can create a new class to use any existing class if you have any.
HI,
Above solutions solved my issue.
Thanks
glad to hear that.