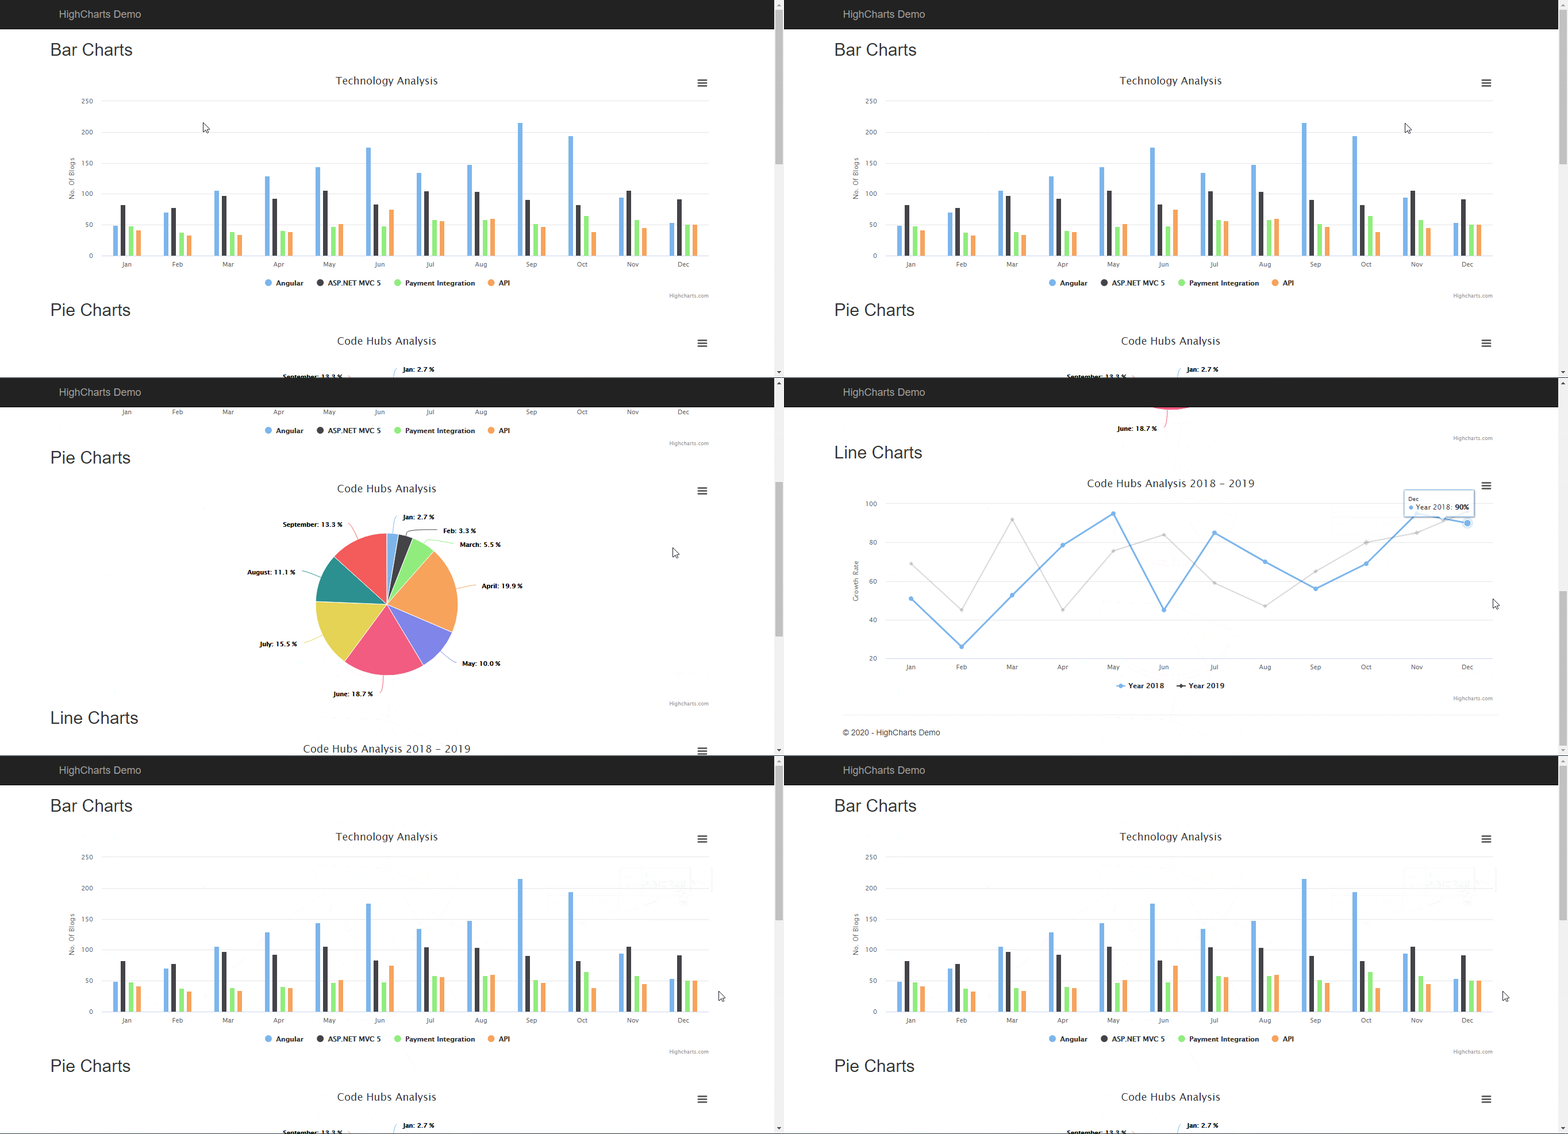
Here, we will learn about developing Highcharts in ASP.NET MVC 5. Charts are a better way to represent any data in the graphical format. We can easily analyze the large data in chart format. Also, they are easy to compare.
Prerequisite:
- Basic knowledge of JavaScript
- Basic knowledge of ASP.NET MVC Structure
Road map for developing the application:
- Create a new ASP.NET MVC 5 application
- Integrate the Highcharts Library in our application
- Creating the Bar Charts
- Creating the Pie Charts
- Creating the Line Charts
Create a new ASP.NET MVC 5 application
Create a new application in ASP.NET MVC 5. If you have no idea of creating the new application and about its basic structure you can refer the following blog for the information.
Integrate the Highcharts Library in our application
<script src="https://code.highcharts.com/highcharts.js"></script>
<script src="https://code.highcharts.com/modules/exporting.js"></script>
<script src="https://code.highcharts.com/modules/export-data.js"></script>
<script src="https://code.highcharts.com/modules/accessibility.js"></script>
Put these JS files in _Layout.cshtml page
<!DOCTYPE html>
<html>
<head>
<meta charset="utf-8" />
<meta name="viewport" content="width=device-width, initial-scale=1.0">
<title>@ViewBag.Title - HighCharts Demo</title>
@Styles.Render("~/Content/css")
@Scripts.Render("~/bundles/modernizr")
</head>
<body>
<div class="navbar navbar-inverse navbar-fixed-top">
<div class="container">
<div class="navbar-header">
<button type="button" class="navbar-toggle" data-toggle="collapse" data-target=".navbar-collapse">
<span class="icon-bar"></span>
<span class="icon-bar"></span>
<span class="icon-bar"></span>
</button>
@Html.ActionLink("HighCharts Demo", "Index", "Home", new { area = "" }, new { @class = "navbar-brand" })
</div>
</div>
</div>
<div class="container body-content">
@RenderBody()
<hr />
<footer>
<p>© @DateTime.Now.Year - HighCharts Demo</p>
</footer>
</div>
@Scripts.Render("~/bundles/jquery")
@Scripts.Render("~/bundles/bootstrap")
<script src="https://code.highcharts.com/highcharts.js"></script>
<script src="https://code.highcharts.com/modules/exporting.js"></script>
<script src="https://code.highcharts.com/modules/export-data.js"></script>
<script src="https://code.highcharts.com/modules/accessibility.js"></script>
@RenderSection("scripts", required: false)
</body>
</html>
Before proceeding further let’s create a new JS file in the Script folder as Charts.js
Write the following code in the Charts.js file inside the following function:
$(document).ready(function () {

});
Creating the Bar Charts
Highcharts.chart('barCharts', {
        chart: {
            type: 'column'
        },
        title: {
            text: 'Technology Analysis'
        },
        xAxis: {
            categories: ['Jan', 'Feb', 'Mar', 'Apr', 'May', 'Jun', 'Jul', 'Aug', 'Sep', 'Oct', 'Nov', 'Dec'],
            crosshair: true
        },
        yAxis: {
            min: 0,
            title: {
                text: 'No. Of Blogs'
            }
        },
        plotOptions: {
            column: {
                pointPadding: 0.2,
                borderWidth: 0
            }
        },
        series: [{
            name: 'Angular',
            data: [49, 71, 106, 129, 144, 176, 135, 148, 216, 194, 95, 54]

        }, {
            name: 'ASP.NET MVC 5',
            data: [83, 78, 98, 93, 106, 84, 105, 104, 91, 83, 106, 92]

        }, {
            name: 'Payment Integration',
            data: [48, 38, 39, 41, 47, 48, 59, 59, 52, 65, 59, 51]

        }, {
            name: 'API',
            data: [42, 33, 34, 39, 52, 75, 57, 60, 47, 39, 46, 51]

        }]
    });
Creating the Pie Charts
Highcharts.chart('pieCharts', {
        chart: {
            plotBackgroundColor: null,
            plotBorderWidth: null,
            plotShadow: false,
            type: 'pie'
        },
        title: {
            text: 'Code Hubs Analysis'
        },
        tooltip: {
            pointFormat: '{series.name}: <b>{point.percentage:.1f}%</b>'
        },
        accessibility: {
            point: {
                valueSuffix: '%'
            }
        },
        plotOptions: {
            pie: {
                allowPointSelect: true,
                cursor: 'pointer',
                dataLabels: {
                    enabled: true,
                    format: '<b>{point.name}</b>: {point.percentage:.1f} %'
                }
            }
        },
        series: [{
            data: [{
                name: 'Jan',
                y: 12,
            }, {
                name: 'Feb',
                y: 15
            }, {
                name: 'March',
                y: 25
            }, {
                name: 'April',
                y: 90
            }, {
                name: 'May',
                y: 45
            }, {
                name: 'June',
                y: 84.6
            }, {
                name: 'July',
                y: 70
            }, {
                name: 'August',
                y: 50
            }, {
                name: 'September',
                y: 60
            }]
        }]
    });
Creating the Line Charts
$('#lineCharts').highcharts({
        title: {
            text: 'Code Hubs Analysis 2018 - 2019',
        },
        xAxis: {
            categories: ['Jan', 'Feb', 'Mar', 'Apr', 'May', 'Jun', 'Jul', 'Aug', 'Sep', 'Oct', 'Nov', 'Dec']
        },
        yAxis: {
            title: {
                text: 'Growth Rate'
            },
        },
        tooltip: {
            valueSuffix: '%'
        },
        series: [{
            name: "Year 2018",
            data: [51, 26, 52.6, 78.5, 95, 45, 85, 70, 56, 69, 95, 90]
        }, {
            name: "Year 2019",
            data: [69, 45, 92, 45, 75.6, 84, 59, 47, 65, 80, 85, 96]
        }]
    });
Write the following HTML in the Index.cshtml file for Home Controller
@{
    ViewBag.Title = "Home Page";
}

<style>
    h2 {
        margin-bottom: 20px;
    }
</style>

<div class="row">
    <h2>Bar Charts</h2>
    <div class="col-md-12" id="barCharts"></div>
    <h2>Pie Charts</h2>
    <div class="col-md-12" id="pieCharts"></div>
    <h2>Line Charts</h2>
    <div class="col-md-12" id="lineCharts"></div>
</div>

@section scripts{
    <script src="~/Scripts/Charts.js"></script>
}
Code in Action:


What if i’d like to make it dynamic? as to display data from database?
Thanks for reading it. The Highcharts with Dynamic data was on my list, so I created one when I read your comment. You can find it from here