In this article, we will learn about how to upload files in ASP.NET.
FileUpload control is used to upload files to the server. It creates a browse button on the form that pops up a window to select the file from the local machine.
This is a server-side control, To implement FileUpload we can drag it from the toolbox of visual studio or ASP.NET provides its own tag to implement FileUpload. The example is given below.
<asp:FileUpload ID="FileUpload1" runat="server" />
The server renders it as the HTML control and produces the following code to the browser.
<input type="file" name="FileUpload1" id="FileUpload1">
This control has its own properties that are tabled below.
| Property | Description |
|---|---|
| AccessKey | This property is used to set keyboard shortcut for the control. |
| TabIndex | The tab order of the control. |
| BackColor | This property is used to set background color of the control. |
| BorderColor | This property is used to set border color of the control. |
| BorderWidth | This property is used to set width of border of the control. |
| Font | This property is used to set font for the control text. |
| ForeColor | This property is used to set color of the control text. |
| Text | This property is used to set text to be shown for the control. |
| ToolTip | It displays the text when mouse is over the control. |
| Visible | To set visibility of control on the form. |
| Height | This property is used to set height of the control. |
| Width | This property is used to set width of the control. |
| AllowMultiple | This property is used to allow upload multiple files by setting true or false. |
Example
In this example, we are uploading a file using FileUpload control.
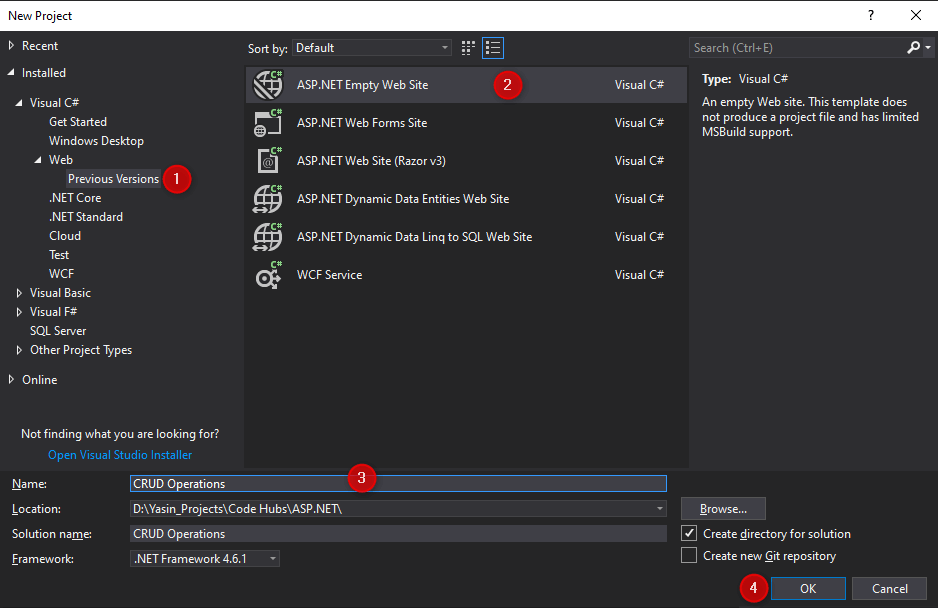
Create a new project and select the ASP.NET Empty Web Site.

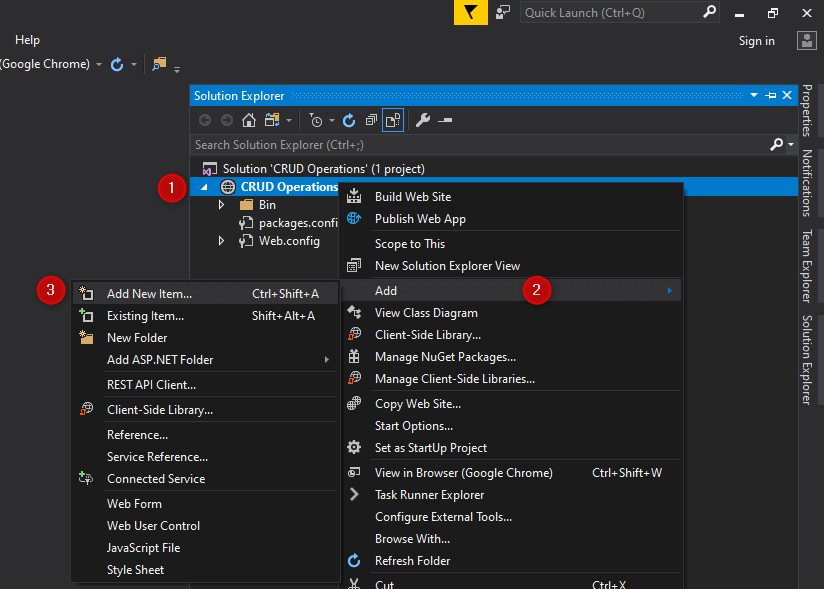
Now, right-click the project name (CRUD Operations) in the Solution Explorer and select Add -> Add New Item.

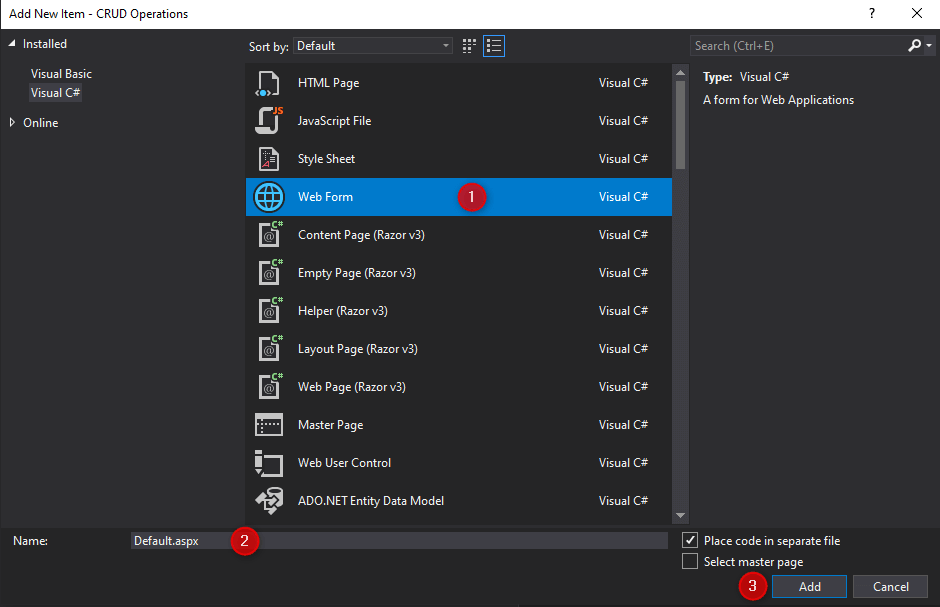
Now, let’s add a new Default.aspx file, select Web Form and click Add.

Open the Default.aspx file and add the code in it.
<%@ Page Language="C#" AutoEventWireup="true" CodeFile="Default.aspx.cs" Inherits="_Default" %>
<!DOCTYPE html>
<html xmlns="http://www.w3.org/1999/xhtml">
<head runat="server">
<title></title>
</head>
<body>
<form id="form1" runat="server">
<div>
<asp:FileUpload ID="FileUpload1" runat="server" /> 
<asp:Button ID="btnUpload" runat="server" Text="Upload" OnClick="btnUpload_Click" />
<br />
<asp:Label ID="lblError" runat="server" Text="" ForeColor="Red"></asp:Label>
<asp:Image ID="Image1" runat="server" />
</div>
</form>
</body>
</html>
Open the Default.aspx.cs file and add the code in it.
using System;
using System.IO;

public partial class _Default : System.Web.UI.Page
{
    protected void Page_Load(object sender, EventArgs e)
    {
        lblError.Text = "";
        Image1.ImageUrl = "";
    }

    protected void btnUpload_Click(object sender, EventArgs e)
    {
        if ((FileUpload1.PostedFile != null) && (FileUpload1.PostedFile.ContentLength > 0))
        {
            string fileName = System.IO.Path.GetFileName(FileUpload1.PostedFile.FileName);
            string filePath = Server.MapPath("~") + "\\upload";
            //Create directory if not exists
            if (!Directory.Exists(filePath))
            {
                Directory.CreateDirectory(filePath);
            }
            string SaveLocation = filePath + "\\" + fileName;
            try
            {
                FileUpload1.PostedFile.SaveAs(SaveLocation);
                Image1.ImageUrl = "~//upload//" + fileName;
            }
            catch (Exception ex)
            {
                lblError.Text = ex.Message;
            }
        }
        else
        {
            lblError.Text = "Please select a file to upload.";
        }
    }
}
That’s it.
Output:


